Netopia Payments
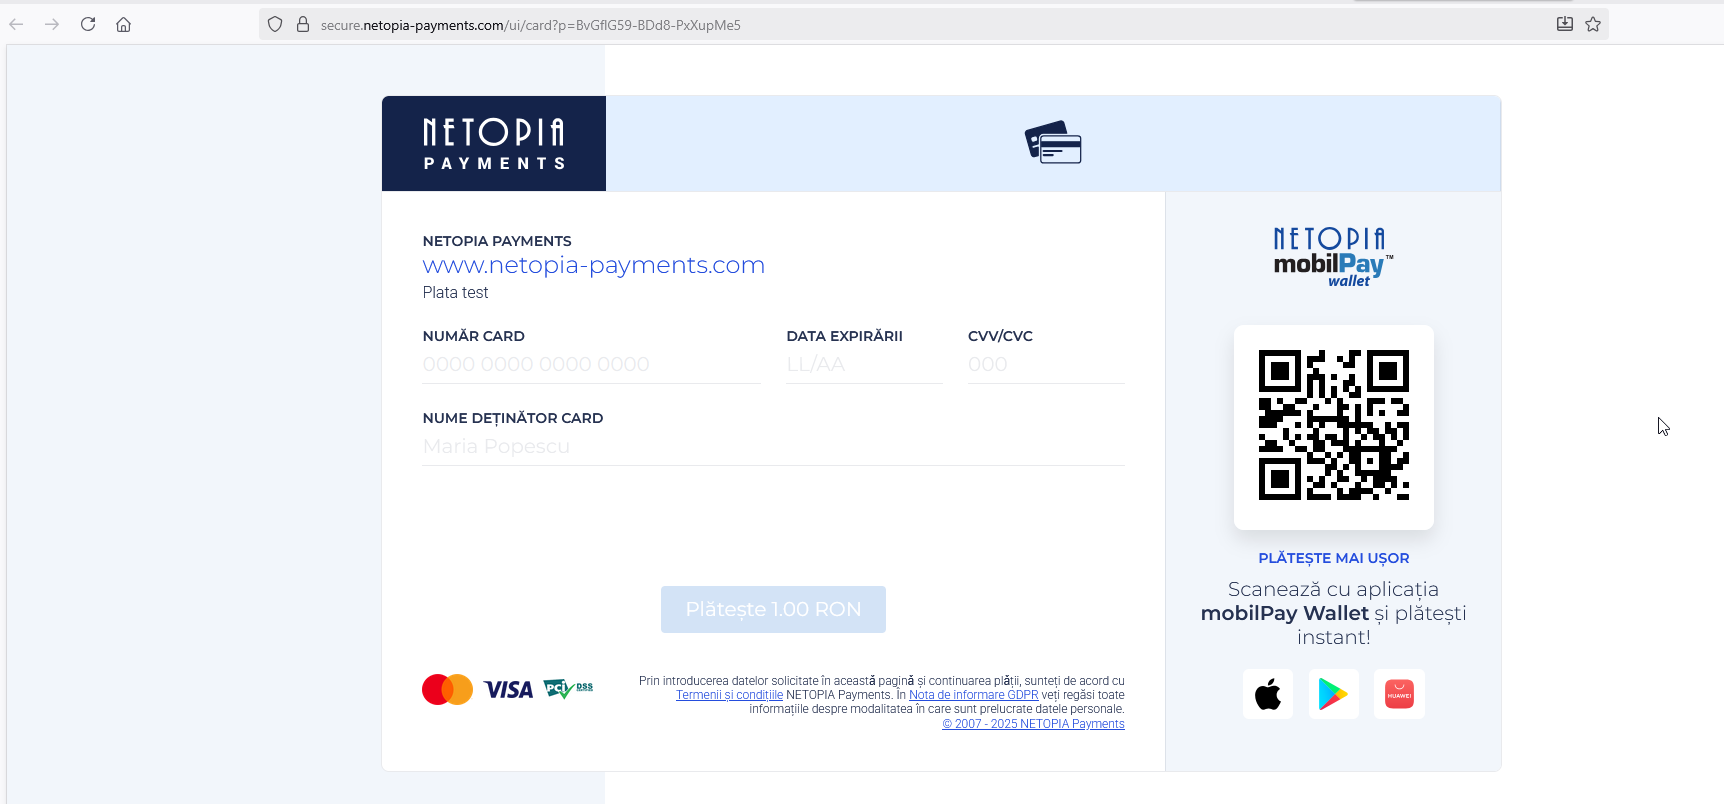
The Netopia Payments integration lets you collect payments directly in your conversational flows. With this integration, your AI Agent can guide users through a seamless payment experience—from capturing billing and shipping details to generating a secure payment link through Netopia Payments.
When users reach the payment step in a conversation, the AI Agent prompts them to enter the required details (such as billing and shipping information, depending on your flow configuration). Once all necessary data is provided, the AI Agent automatically sends the user a payment link generated by Netopia. Users can then complete the transaction securely through the Netopia payment gateway.
This integration streamlines your sales or billing processes by combining conversational engagement with fast, secure online payments—all within the chat interface.
Prerequisites
Before you begin, make sure you have the following:
- An active merchant account with Netopia Payments. Having an active account means you’ve already signed a contract with Netopia and completed the required onboarding steps.
- A configured Point of Sale (POS) in the Netopia Payments Portal for your e-commerce solution, linked to your domain.
Integrating Netopia Payments in your conversations
This section explains how to configure Netopia Payments in your conversational flows.
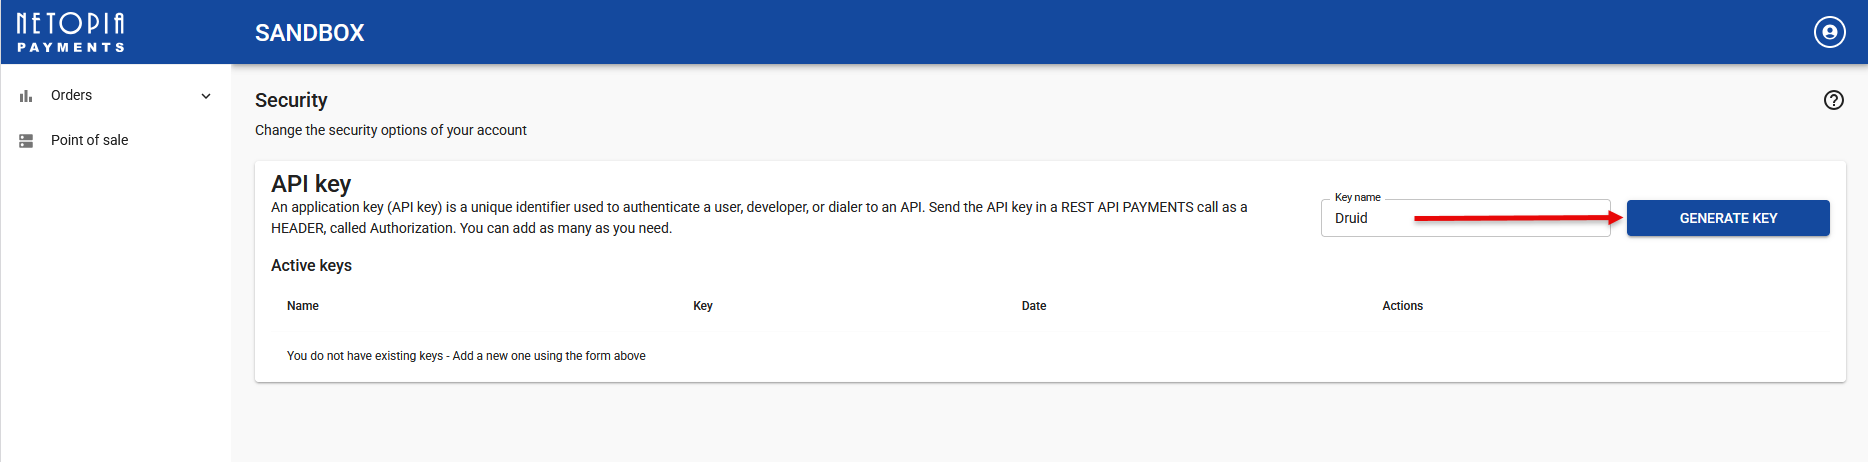
Step 1. Generate an API Key for your Netopia Payments profile
- Go to Netopia Payments admin console and log in.
- To generate an API Key for a Sandbox environment, click Sandbox on the main menu.
- In the top-right corner, click on the profile icon and select Security.
- Enter a key name, then click GENERATE KEY.
- Copy the API key value as you will need it to configure the payment app in the Druid Portal.

The API key page appears.
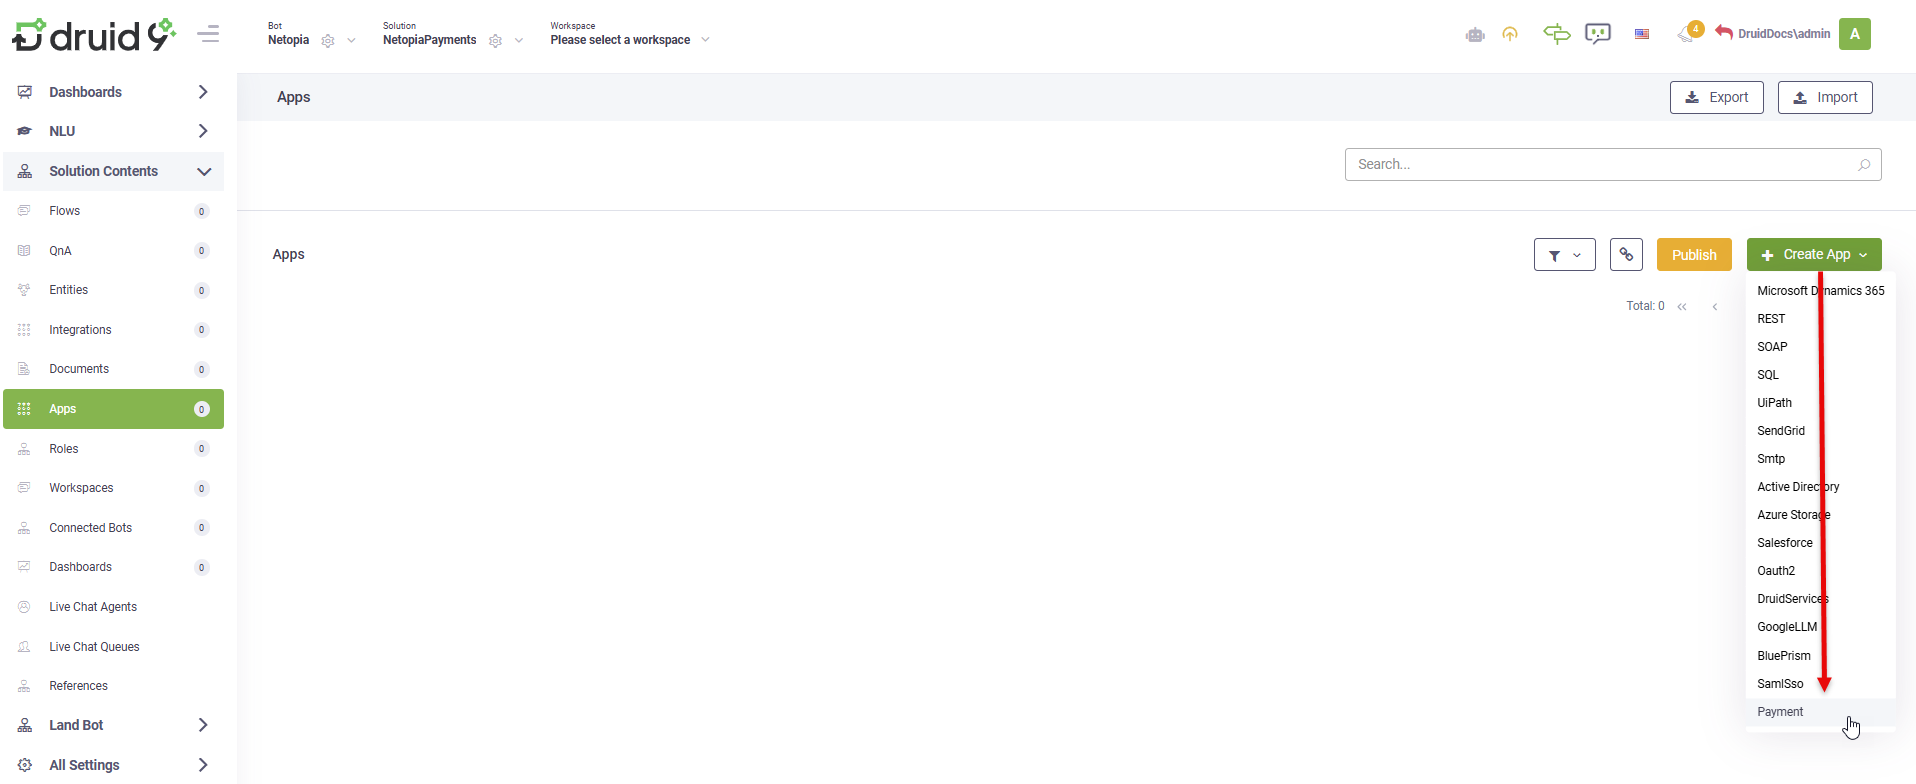
Step 2. Create a Netopia Payments app
To configure a payment app in Druid Portal:
- Go to Solution Contents > Apps.
- In the top-right corner, click Create App and select Payment.
- In the Code field, enter a unique name for your app.
- From the NETOPIA Payment Environment drop-down, select the environment type: Sandbox or Live.
- In the API Key field, enter the API key you generated at Step 1.
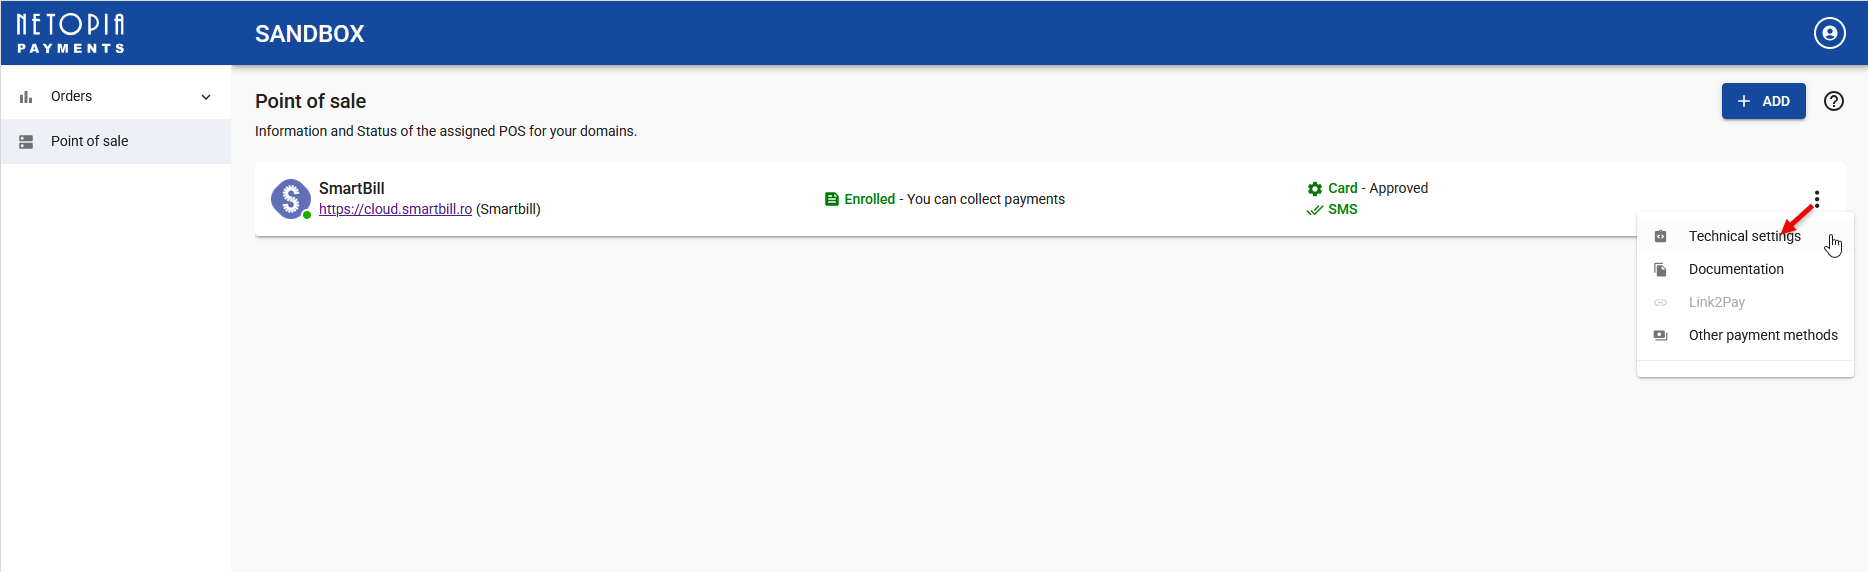
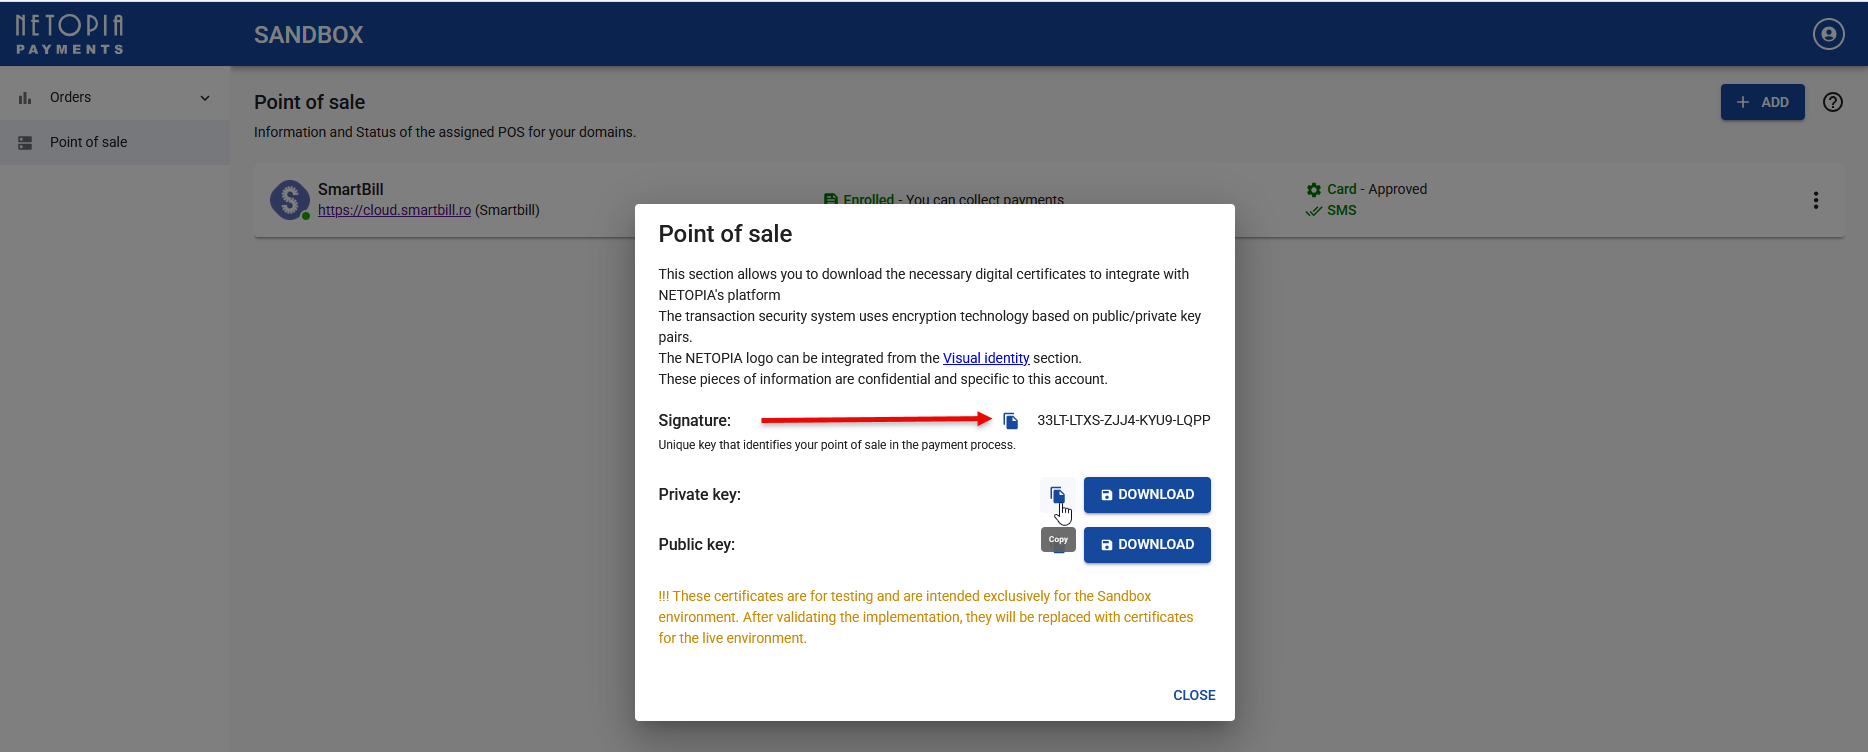
- In the POS Signature field, enter the Signature generated for your POS in the Netopia Payments admin console. To get the Signature, follow these steps:
- Go to Netopia Payments admin console and log in.
- To view POS details for the sandbox environment, click Sandbox on the main menu, then in the sandbox environment, click Point of sale on the main menu.
- Next to your e-commerce provider, click the Actions icon (⋮) and select Technical settings.
- Copy the Signature.
- (Optional) Update the following settings:
- Default currency: The default value is RON. You can change it here; this setting overrides the default.
- Default language: The default is Romanian. You can change it using the ISO 3166-1 numeric code for the desired country.
- Save, then publish the app.
The app configuration page appears.
Step 3. Configure the payment flow
Add a new flow for payments and configure it as follows:
- Add prompt steps to capture the information provided in the table below. Pay attention to the entity fields you need to enter in Input mapping for each prompt step.
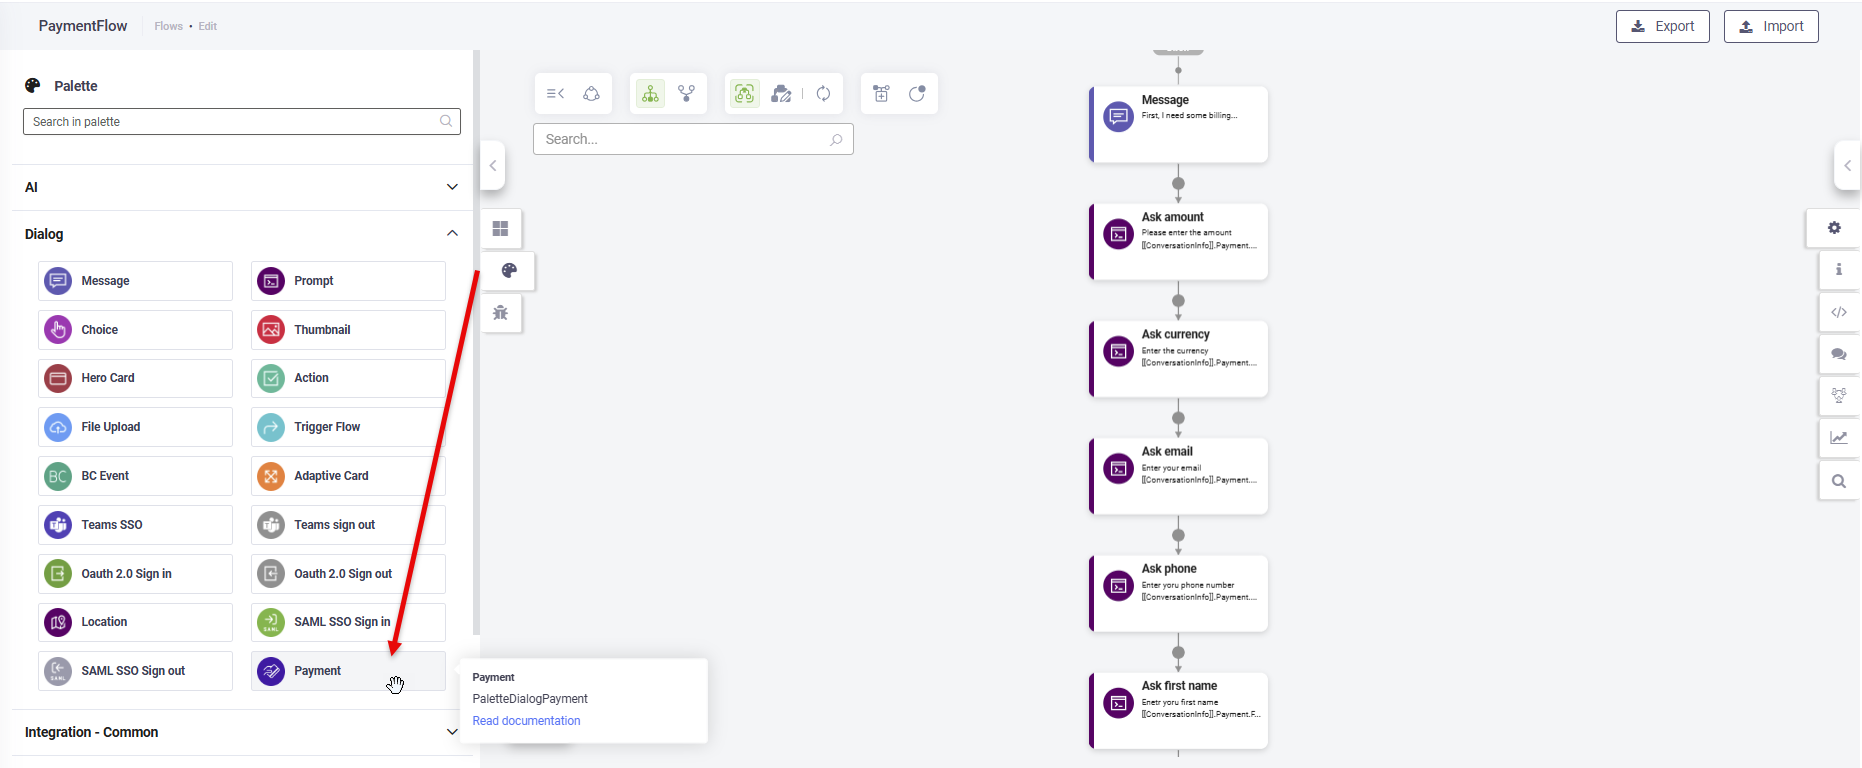
- From the Flow Palette, add the Payment flow step and click the Configuration icon.
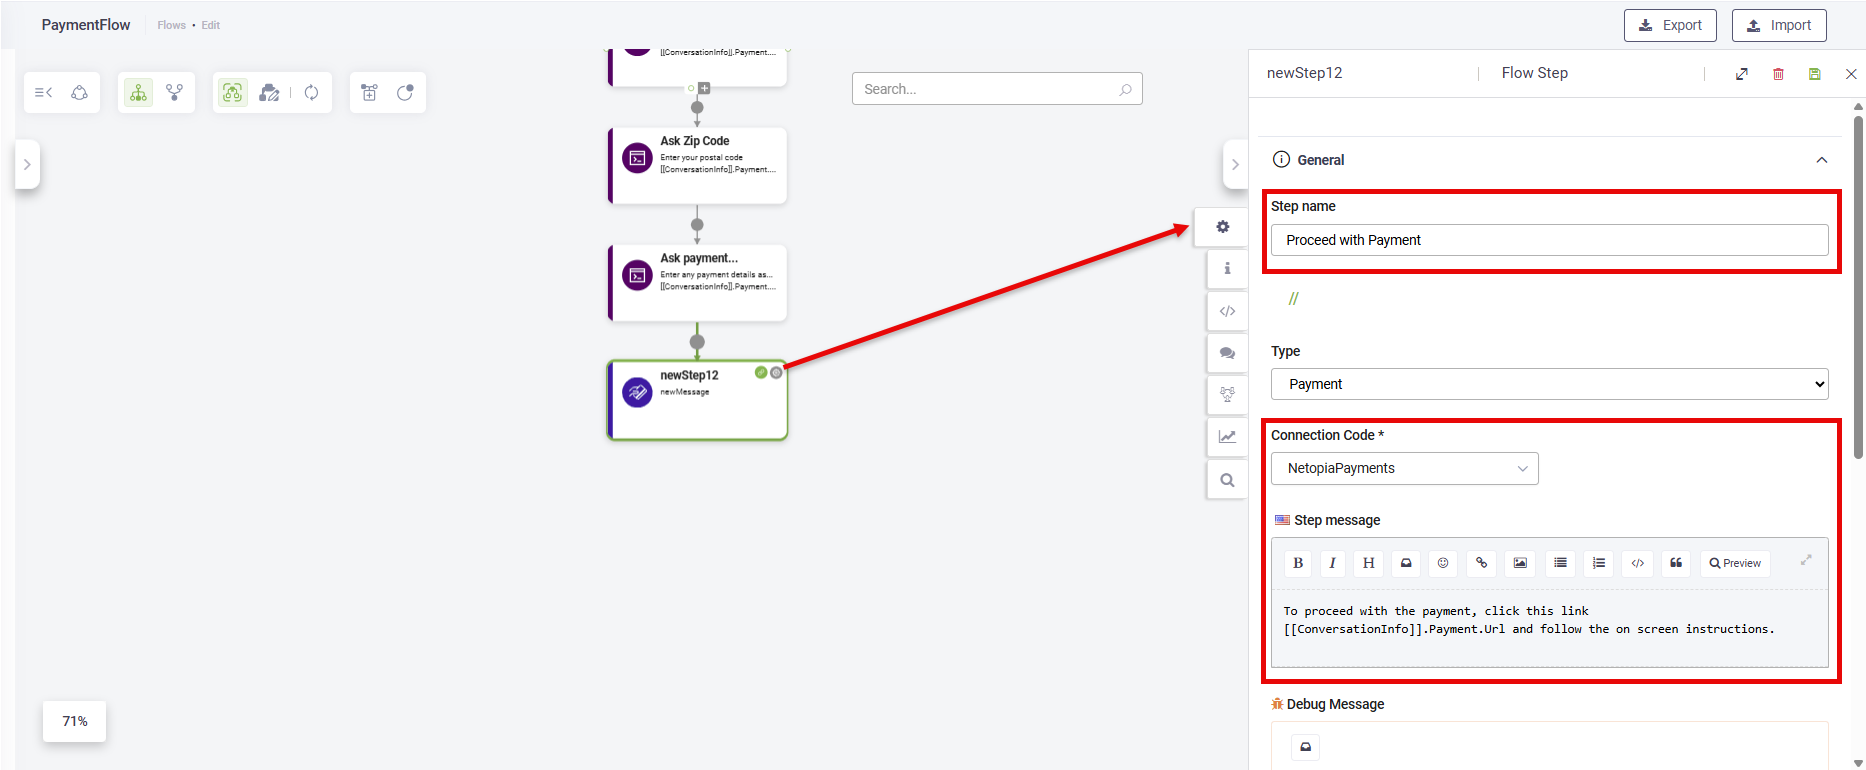
- Click on the General section.
- Enter a Step name.
- From the Connection Code drop-down, select the Netopia Payments app you created at Step 2.
- In the Step message field, enter a message that includes the entity field [[ConversationInfo]].Payment.Url. This entity field stores the Netopia payment URL that users access to complete their payment.
- Save the step.
| Information type | Required | Ask the user for | Info type | Input mapping |
|---|---|---|---|---|
| Billing information | Yes | amount | decimal | [[ConversationInfo]].Payment.Amount |
| currency | string | [[ConversationInfo]].Payment.Currency | ||
| string | [[ConversationInfo]].Payment.Email | |||
| phone | string | [[ConversationInfo]].Payment.Phone | ||
| first name | string | [[ConversationInfo]].Payment.FirstName | ||
| last name | string | [[ConversationInfo]].Payment.LastName | ||
| city | string | [[ConversationInfo]].Payment.City | ||
| country |
integer ISO 3166-1 numeric code for the country |
[[ConversationInfo]].Payment.Country | ||
| state | string | [[ConversationInfo]].Payment.State | ||
| postal code | string | [[ConversationInfo]].Payment.ZipCode | ||
| details | string | [[ConversationInfo]].Payment.Details | ||
| Shipping information |
No NOTE: If you don’t collect shipping information from the user, the billing information is automatically used as the shipping information.
|
string | [[ConversationInfo]].PaymentShipping.Email | |
| phone | string | [[ConversationInfo]].PaymentShipping.Phone | ||
| first name | string | [[ConversationInfo]].PaymentShipping.FirstName | ||
| last name | string | [[ConversationInfo]].PaymentShipping.LastName | ||
| city | string | [[ConversationInfo]].PaymentShipping.City | ||
| country | string | [[ConversationInfo]].PaymentShipping.Country | ||
| state | string | [[ConversationInfo]].PaymentShipping.State | ||
| postal code |
integer ISO 3166-1 numeric code for the country |
[[ConversationInfo]].PaymentShipping.ZipCode | ||
| details | string | [[ConversationInfo]].PaymentShipping.Details |

For example, 'To proceed with the payment, click this link: [[ConversationInfo]].Payment.Url, and follow the on-screen instructions.
When the conversation reaches the payment step, the system automatically validates all payment information provided by the user in the prompt steps. If any required information is missing or invalid, an error message is displayed until all necessary details are provided.
This validation helps conversation authors properly configure and test their payment flows before deploying the AI Agent to production, ensuring that all required data is captured correctly.
Testing on Netopia Sandbox
When testing the Netopia Payments integration in sandbox mode, please note the following important details:
| Card number | CVV | Expiry | Expected result |
|---|---|---|---|
| 9900004810225098 | 111 | Any future date | Successful payment |
| 9900541631437790 | 111 | Any future date | Expired card |
| 9900518572831942 | 111 | Any future date | Insufficient funds |
| 9900827979991500 | Any CVV | Any future date | Incorrect CVV |
| 9900334791085173 | 111 | Any future date | High-risk/fraud scenario |
Payment Transaction Details
The Netopia Payments integration provides the full transaction details into the conversation context —including issuer information, currency, and Netopia identifiers.
When a payment is processed, Druid populates the [[ConversationInfo]].Payment.Status entity field with a JSON object containing the full response from Netopia.
To use these details within your conversational flows, use Code Extension on the flow step to map the specific properties from the JSON object to your Druid entity fields.
The following JavaScript snippet demonstrates how to parse the response and assign values to your payment entities:
// Parse the JSON string from the system variable
let s = JSON.parse([[ConversationInfo]].Payment.Status);

// Map transaction details to Druid entity fields
[[ConversationInfo]].Payment.Id = s.payment.ntpID; // The unique Netopia transaction identifier.
[[ConversationInfo]].Payment.Name = s.payment.data.ISSUER; // The bank name that issued the card
[[ConversationInfo]].Payment.Amount = s.payment.amount;
[[ConversationInfo]].Payment.Currency = s.payment.currency;
Netopia Response Examples
This section provides response examples for the three possible situation.
Standard Success (Non-3DS)
In a standard successful transaction, the customerAction object is empty, and the payment data includes specific card details like the issuer name.
Response Example
{
    "error": {
    "code": "00",
    "message": "Approved"
  },
  "payment": {
    "amount": 200,
    "currency": "RON",
    "data": {
      "AuthCode": "24od",
      "BIN": "990000",
      "ISSUER": "Netopia GB",
      "ISSUER_COUNTRY": "642",
      "RRN": "hYnY8zpdcNo-"
    },
    "ntpID": "1309088",
    "status": 3,
    "token": "MjMyMjqqdx3XTbYC78OoidTk6DTtEvHcrqcz91Pr4PQqXf/u33xoDkdgIlkq226avk1ik8fvLElkbLopnvNbIs8+Ve6L"
  }
}
3D Secure (3DS) Redirect
When 3DS authentication is required, the customerAction object is populated with the redirect URL and the authentication token. Note that the payment.data object is typically not present.
{
  "customerAction": {
    "authenticationToken": "iNPqJWDRoRXsd77StNELrv...",
    "formData": {
      "backUrl": "http://yourdomain.com/example/backUrl.php",
      "paReq": "AT5ewtLVDsEgB5lcRjeEoSMF..."
    },
    "type": "Authentication3D",
    "url": "https://secure.sandbox.netopia-payments.com/sandbox/authorize"
  },
  "error": {
    "code": "100",
    "message": "Approved"
  },
  "payment": {
    "amount": 200,
    "currency": "RON",
    "ntpID": "1310396",
    "status": 15
  }
}
Payment Transaction Error
If the transaction fails (e.g., the order is closed or funds are insufficient), the error object provides the the specific reason for the failure and the payment.status reflects the error type.
{
  "customerAction": {},
  "error": {
    "code": "56",
    "message": "Order closed"
  },
  "payment": {
    "amount": 200,
    "currency": "RON",
    "ntpID": "1309088",
    "status": 5
  }
}
Payment Status Codes
The most common status codes are:
- 3 — Payment completed (paid)
- 5 — Payment confirmed
- 12 — Invalid account
- 15 — Requires authorization
For a complete list of status codes and error messages, refer to the Netopia Errors & Statuses documentation.
Tracking Payment History
Druid maintains a comprehensive audit log of all payment trials within a single session. If a user enters incorrect data or a transaction fails (e.g., insufficient funds), the Payment flow step execution remains open. The step only completes once a "Success" or "Cancel" event is received from Netopia.
All transaction attempts are stored in an JArray within the [[Payment]].Status object. This allows authors to access the entire payment history in the conversation context after the step is completed, which can then be saved to an external database.
The [[Payment]].Status contains the final status and an Audit array containing details for every attempt:
- orderID: The unique identifier for the order.
- status: The numerical status code from Netopia.
- message: The response message (e.g., "Insufficient funds" or "Approved").
- ntpID: The Netopia transaction ID.
Example Script to Extract Audit Data
You can use a code extension to parse the payment status and retrieve specific payment retry data:
(
  function ()
  {
        let s = JSON.parse([[ConversationInfo]].Payment.Status)
        [[ConversationInfo]].Payment.Id = s.Status;
        let a = JSON.parse(s.Audit);
        [[ConversationInfo]].Payment.Name = a[0]["payment"]["status"];
  }
)();